Using the Helix Empty Space Addon
The Helix Framework, specifically in its Helix Ultimate version, offers a variety of addons that enhance your website’s layout and design. One particularly useful addon is the Empty Space addon, which allows you to create spaces between elements without adding any content. This guide will walk you through the steps to effectively use the Empty Space addon.
What is the Empty Space Addon?

The Empty Space addon serves as a placeholder that creates vertical or horizontal spacing within your layout. This can be particularly helpful for:
- Improving visual hierarchy.
- Preventing clutter by spacing out different sections.
- Allowing for better responsive design by controlling how elements stack on smaller screens.
How to Use the Empty Space Addon
Step 1: Access the Joomla Admin Panel
- Log in to Your Joomla Admin: Start by logging into your Joomla administrator panel.
- Navigate to the Page Builder: Go to the component where you manage your page layouts (like SP Page Builder or Helix’s built-in layout manager).
Step 2: Open the Page or Layout
- Select the Page: Choose the page where you want to add the Empty Space addon.
- Edit the Layout: Click on the edit button to enter the layout editing mode.
Step 3: Add the Empty Space Addon
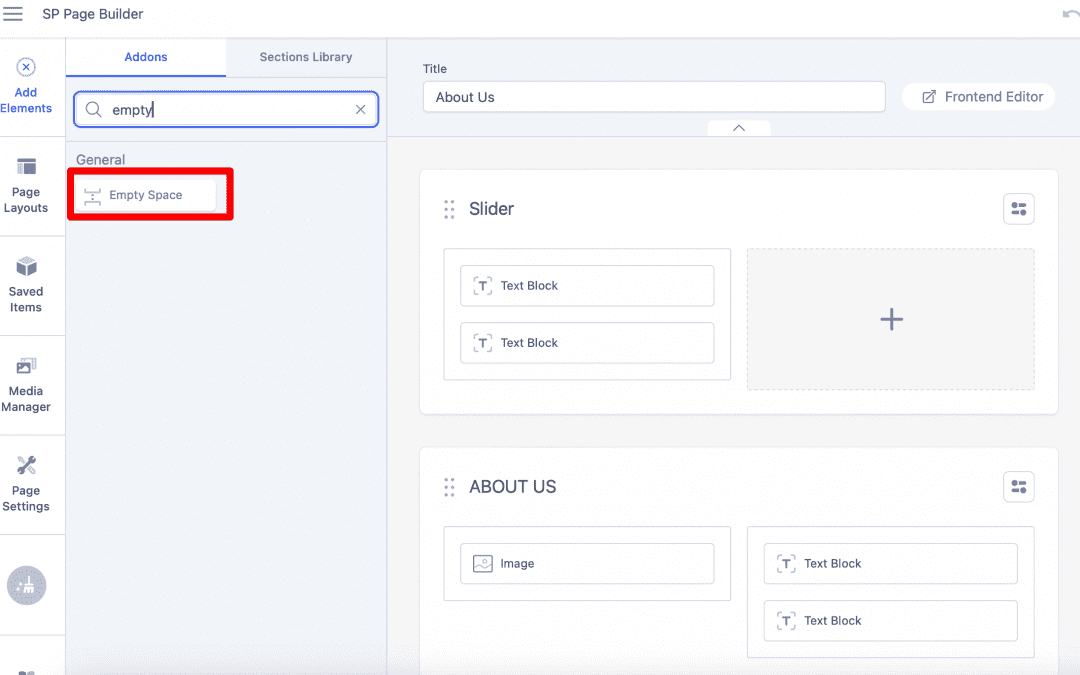
- Locate the Addons Panel: On the layout editing screen, look for the addons panel, which lists all available addons.
- Find the Empty Space Addon: Scroll through the list or use the search function to locate the Empty Space addon.
- Drag and Drop: Click and drag the Empty Space addon to the desired position in your layout. You can place it between other content elements or at the beginning or end of a section.
Step 4: Configure the Empty Space Addon
- Adjust Height: After adding the Empty Space addon, you can configure its height:
- Click on the Empty Space addon to open its settings.
- Enter a value for the height in pixels (e.g.,
30px,50px). This value determines how much space will be created.
- Responsive Settings: If your design requires different spacings for various devices, check if there are responsive settings available:
- Set different heights for mobile, tablet, and desktop views if needed.
Step 5: Save and Preview
- Save Your Changes: After configuring the addon, save your changes.
- Preview the Page: Use the preview option to see how the Empty Space addon affects your layout. Make sure the spacing looks good on all devices.
Step 6: Adjust as Needed
- Fine-Tune the Spacing: After previewing, you may decide to adjust the height. Go back to the Empty Space addon settings and modify the value as needed.
- Check for Overall Design: Ensure that the added space complements the overall design of your page. Adjust other elements if necessary to maintain balance.
Best Practices for Using the Empty Space Addon
- Use Sparingly: While the Empty Space addon can help improve design, overusing it can lead to excessive whitespace and disrupt the flow of content.
- Maintain Consistency: Try to use similar spacing throughout your website for a cohesive look.
- Test Responsiveness: Always check how the empty space appears on different devices to ensure a good user experience.
Conclusion
The Helix Empty Space addon is a simple yet powerful tool for enhancing your website’s layout. By following the steps outlined in this guide, you can effectively use the addon to create the desired spacing between your elements, leading to a more organized and visually appealing design. Remember to preview your changes and adjust as necessary to achieve the best results.

Hello everyone! We’re Galussothemes content team, we love to write new blogs for WordPress Joomla! and other tech niches everyday. We’re talented young people who hold a strong passion for website development, designing, and marketing. Feel free to leave your comment if you have any issues or questions with our blogs.


