Web fonts have become a staple in modern web design, enhancing the visual appeal and readability of websites. Google Web Fonts offers a vast library of free fonts that can be easily integrated into your WordPress themes. However, adding these fonts the right way is crucial for maintaining your website’s performance and ensuring a seamless user experience. In this blog post, we’ll explore the best practices for adding Google Web Fonts to your WordPress themes.
Why Use Google Web Fonts?
Before diving into the implementation, let’s discuss why you might want to use Google Web Fonts:
- Variety: Google offers a wide selection of fonts, giving you plenty of options to match your site’s branding.
- Performance: Google’s CDN (Content Delivery Network) ensures fast loading times for fonts.
- Ease of Use: They can be easily integrated into your site with just a few lines of code.
Methods to Add Google Web Fonts
Method 1: Using the WordPress Customizer
- Access the Customizer:
- Go to your WordPress dashboard.
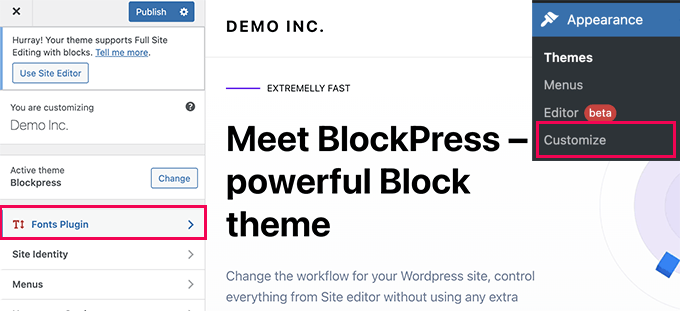
- Navigate to Appearance > Customize.
- Find the Typography Section:
- Look for a section related to typography or fonts. This may vary depending on your theme.
- Select Your Font:
- If your theme supports Google Fonts, you’ll likely find an option to choose a font from a dropdown menu.
- Save Changes:
- After selecting your desired font, be sure to save your changes.
Method 2: Using a Plugin

If your theme does not support Google Fonts, you can use a plugin:
- Install a Plugin:
- Search for plugins like Easy Google Fonts or Fonts Plugin in the WordPress plugin repository.
- Install and activate the plugin.
- Configure the Plugin:
- Go to the plugin settings, usually found under Appearance.
- Choose your desired Google Fonts and customize their usage across different elements of your site.
- Save Changes:
- Don’t forget to save your settings before exiting.
Method 3: Manually Adding Fonts via Code
Integrating Google Web Fonts into your WordPress theme can elevate your website’s design and readability. This guide will walk you through the process of adding these fonts directly to your theme’s header, ensuring a seamless experience.

Step 1: Choose Your Font
- Visit the [Google Fonts] website.
- Browse and select the font you wish to use.
- Choose the styles (e.g., regular, bold) you need.
Step 2: Get the Embed Code
- Once you’ve selected your font, navigate to the “Embed” section on the right.
- Copy the provided
<link>tag, which looks like this:<link href="https://fonts.googleapis.com/css2?family=Roboto:wght@400;700&display=swap" rel="stylesheet">
Step 3: Add the Code to Your Theme’s Header
Method 1: Using header.php
- Access Your Theme Files: Go to your WordPress dashboard, then navigate to Appearance > Theme Editor.
- Open
header.php: Find and open theheader.phpfile of your active theme. - Insert the Link: Paste the copied
<link>tag within the<head>section, before the closing</head>tag:<!DOCTYPE html> <html <?php language_attributes(); ?>> <head> <meta charset="<?php bloginfo( 'charset' ); ?>"> <meta name="viewport" content="width=device-width, initial-scale=1"> <link href="https://fonts.googleapis.com/css2?family=Roboto:wght@400;700&display=swap" rel="stylesheet"> <?php wp_head(); ?> </head> - Save Changes: Click “Update File” to save your modifications.
Method 2: Using functions.php
- Open
functions.php: In the Theme Editor, locate thefunctions.phpfile. - Enqueue the Font: Add the following code to enqueue the font:
function add_google_fonts() { wp_enqueue_style('google-fonts', 'https://fonts.googleapis.com/css2?family=Roboto:wght@400;700&display=swap', false); } add_action('wp_enqueue_scripts', 'add_google_fonts'); - Save Changes: Click “Update File” to save your changes.
Step 4: Apply the Font in Your CSS
Now that the font is loaded, you need to apply it to your website:
- Go to Customizer: Navigate to Appearance > Customize.
- Add Custom CSS: In the “Additional CSS” section, add your styles:
body { font-family: 'Roboto', sans-serif; /* Use the Google Font */ } - Publish Changes: Click “Publish” to apply the changes.
Method 4: Using a Child Theme
Using a child theme in WordPress is a best practice for customizing your website without losing changes during theme updates. This guide will walk you through the steps to add Google Web Fonts using a child theme.
Step 1: Create a Child Theme
- Create a New Folder: In your WordPress installation, navigate to
wp-content/themes/and create a new folder for your child theme (e.g.,yourtheme-child). - Create a
style.cssFile: In your child theme folder, create a file namedstyle.cssand add the following header:/* Theme Name: Your Theme Child Template: yourtheme */Replace
Your Theme Childwith your child theme name andyourthemewith the directory name of your parent theme. - Create a
functions.phpFile: In the same folder, create a file namedfunctions.php. This file will be used to enqueue your Google Fonts.
Step 2: Enqueue Google Fonts
- Add the Font Enqueue Function: Open the
functions.phpfile you just created and add the following code:<?php function add_google_fonts() { wp_enqueue_style('google-fonts', 'https://fonts.googleapis.com/css2?family=Roboto:wght@400;700&display=swap', false); } add_action('wp_enqueue_scripts', 'add_google_fonts');This code will load the Roboto font from Google Fonts.
Step 3: Activate Your Child Theme
- Go to the WordPress Dashboard: Navigate to Appearance > Themes.
- Activate Child Theme: Find your child theme and click the “Activate” button.
Step 4: Apply the Font in Your CSS
- Add Custom Styles: You can add custom CSS to your
style.cssfile to apply the Google Font across your site. For example:body { font-family: 'Roboto', sans-serif; /* Apply the Google Font */ }
Step 5: Test Your Changes
- Visit Your Site: Open your website in a browser and check if the Google Font is applied.
- Inspect and Adjust: Use browser developer tools to make further adjustments as needed.
Best Practices for Using Google Fonts
- Limit the Number of Fonts: Using too many different fonts can slow down your site. Stick to 2-3 fonts for a cohesive look.
- Optimize for Performance: Use only the styles (weights and italics) that you need. This helps reduce loading time.
- Consider Fallback Fonts: Always include a fallback font in your CSS in case the Google Font fails to load.
body {
    font-family: 'Roboto', Arial, sans-serif;
}
Conclusion
Adding Google Web Fonts to your WordPress theme can significantly enhance your site’s design and user experience. Whether you choose to use the Customizer, a plugin, or add them manually, following best practices ensures that your site remains fast and functional. By carefully selecting fonts that align with your branding, you can create a visually appealing website that captures your audience’s attention. Happy styling!

Hello everyone! We’re Galussothemes content team, we love to write new blogs for WordPress Joomla! and other tech niches everyday. We’re talented young people who hold a strong passion for website development, designing, and marketing. Feel free to leave your comment if you have any issues or questions with our blogs.


