Are you struggling to add and align images in Gutenberg editor? Don’t worry, we’ve got you covered! In this blog post, we’ll walk you through the steps to add and align images in WordPress’s new Gutenberg editor. We’ll also share some tips and tricks to help make your life easier when it comes to designing content with images. So let’s get started!
Introduction about WordPress block editor (Gutenberg)
WordPress Block editor is known as the Gutenberg editor which is introduced in WordPress version 5.0 as a replacement for the classic editor. This editor provides you with visual and user-friendly interfaces, making it easier for users to create and manage their content, even if you are a beginner with little technical knowledge.
With the Gutenberg editor, you can easily add images in various blocks to create dynamic and eye-catching content for your website. Moreover, this new editor has improved a lot of issues related to images including image alignment problems.
In today’s blog, we will provide you with a step-by-step tutorial to help you easily add and align images in Gutenberg editor. Now, let’s check them out.
How to add and align images in Gutenberg editor?
As you know, the Gutenberg editor allows you to create exciting content via plenty of helpful blocks. Hence, to add and align images in Gutenberg editor, you can flexibility ultilize one of the following blocks to add tons of images to your posts/pages.
- Image
- Inline image
- Gallery
- Media & Text
- Cover
Here are the steps to add and align an image in the WordPress Block Editor:
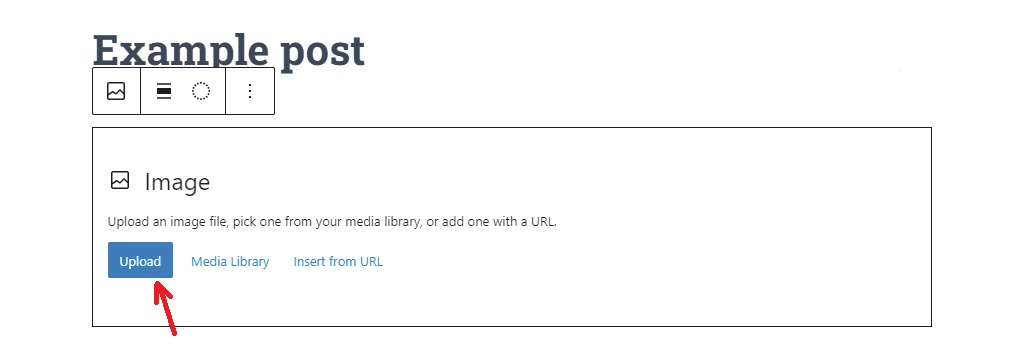
- Add an Image block by clicking on the “Add block” button and looking for the “Image” block, then add it to your content.

- Upload or select an image from the media library.
- Click on the block to reveal the block tools.
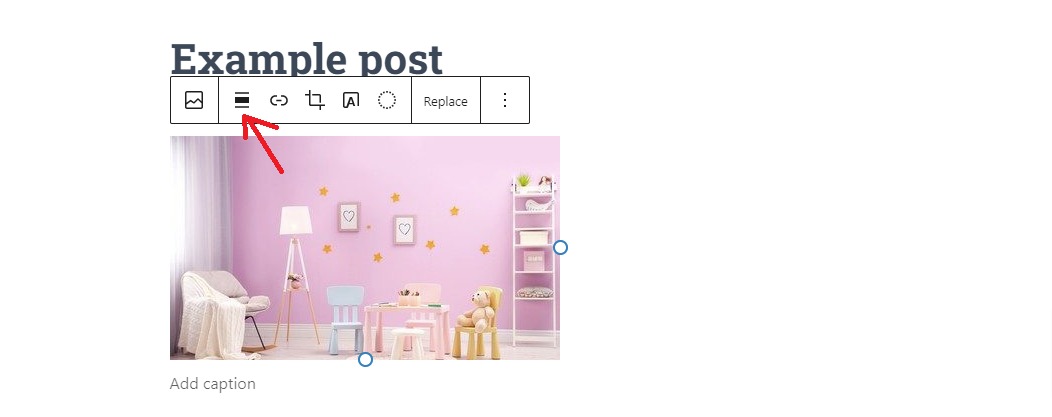
- Find the alignment tools, represented by icons of vertical lines including:
- Align Left
- Align Center
- Align Right
- Wide Width
- Full Width
- Choose the desired alignment by clicking on the appropriate icon.
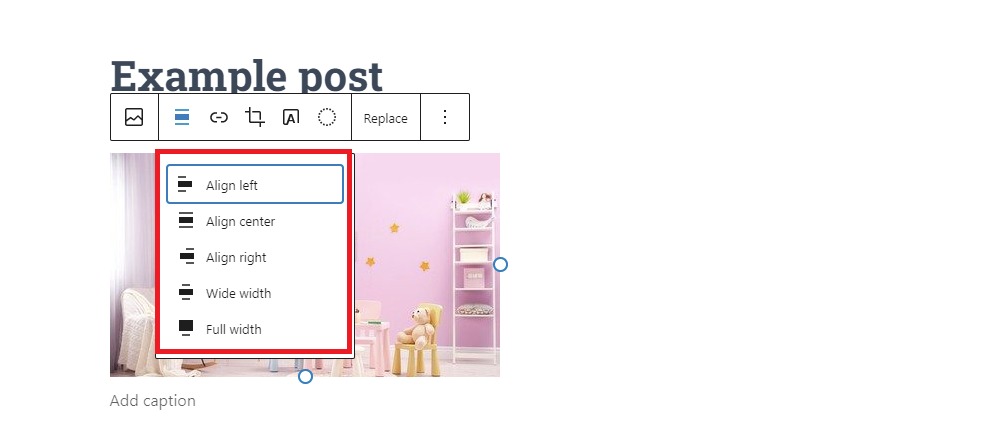
- The image will be aligned according to the selected option. For example, if you select the “Full-width” option, then your image will fit the screen. Nevertheless, this option only works well once your image is uploaded in a large size and high resolution.

How to align an image next to text?
To align an image next to text in the WordPress Block Editor, you can use the Columns block or Media & text block. These blocks will allow you to divide the content into multiple columns, so you can place the text and the image side by side.
Now, we will guide you to align an image next to the text by using the “Media & Text” block:
After the “Media&text” block is added to your content, you will see 2 columns where you can place the image in the first one and the text in another one.

Once the image has been added, click inside the text area and type or paste the desired text.

Now, you can use the alignment options in the block settings to align the image to the left, right, or center of the text.
In addition, you can also adjust the width of the image and text areas as desired.

The image’s alignment will automatically adjust to the height of the text to fit the height of the image. You can preview the content to ensure the image and text are aligned as desired.

How to align gallery in WordPress Block editor?
One of the benefits of Gutenberg is that it allows you to display tons of stunning images in a grid or slideshow format.
Similar to other blocks, to align the gallery in the WordPress Block editor, you can follow the steps below.
- Add the “Gallery” block to your content.
- Upload or select the desired images from the media library.
- In the block settings, select the desired gallery layout, such as a grid or a slideshow.
- Adjust the number of columns and the size of the images as desired.
- Use the block alignment options in the block settings to align the gallery to the left, right, center, or full width of the page.
- Preview the content to ensure the gallery is aligned as desired.

Although the block editor has plenty of improvements to help you easily align images in the gallery, it still exists some limitations. You can use one of the best WordPress Image Gallery plugins to enhance the functionality of Gutenberg.
Moreover, adding a lightbox to the Gutenberg gallery block is also a great way to make your gallery more eye-catching. You can use the WordPress lightbox plugins to achieve this task.
How to add two images side by side in the WordPress block editor?
If you want to display two images side by side in the WordPress Block editor, you can Gallery block which allows you to place images in a separate column.
After adding the images to the gallery block, then they will be showcased next to each other. You can enable the “Crop images” option to make sure that thumbnails are cropped to align.

Wrap up
The Gutenberg editor provides an easy way to add and align images in WordPress. With the help of Image Blocks and the Media and Text block, users can easily achieve different image alignment options and create aesthetically pleasing content for their websites. Whether you’re a beginner or an experienced webmaster, you can use the Gutenberg editor to easily insert images and align them in a very efficient manner.
Hopefully, with the assistance of our blog, you effortlessly add and align images in Gutenberg editor. If you have any difficult tasks related to the Gutenberg editor, don’t hesitate to mention them in the comment below. We will support you as soon as possible.
Besides that, you can drop by our website where we provide you with tons of eye-catching, professional, free WordPress Themes. They will help you quickly build your dream website.

Hello everyone! We’re Galussothemes content team, we love to write new blogs for WordPress Joomla! and other tech niches everyday. We’re talented young people who hold a strong passion for website development, designing, and marketing. Feel free to leave your comment if you have any issues or questions with our blogs.

