You want a sale to go live at midnight on Friday and stop on Monday night, but you do not want to be awake at 00:01 to edit prices by hand. WooCommerce can do this without a plugin: every product and every variation has a built-in sale schedule, and the store switches the prices on and off for you. This guide shows how to schedule a sale in WooCommerce for one product, for a whole catalogue, and for variable products, plus how to check that the schedule will actually fire.
The steps below use the current WooCommerce admin screens and the classic product editor. They work the same on any theme, including block themes.
How WooCommerce scheduled sales work
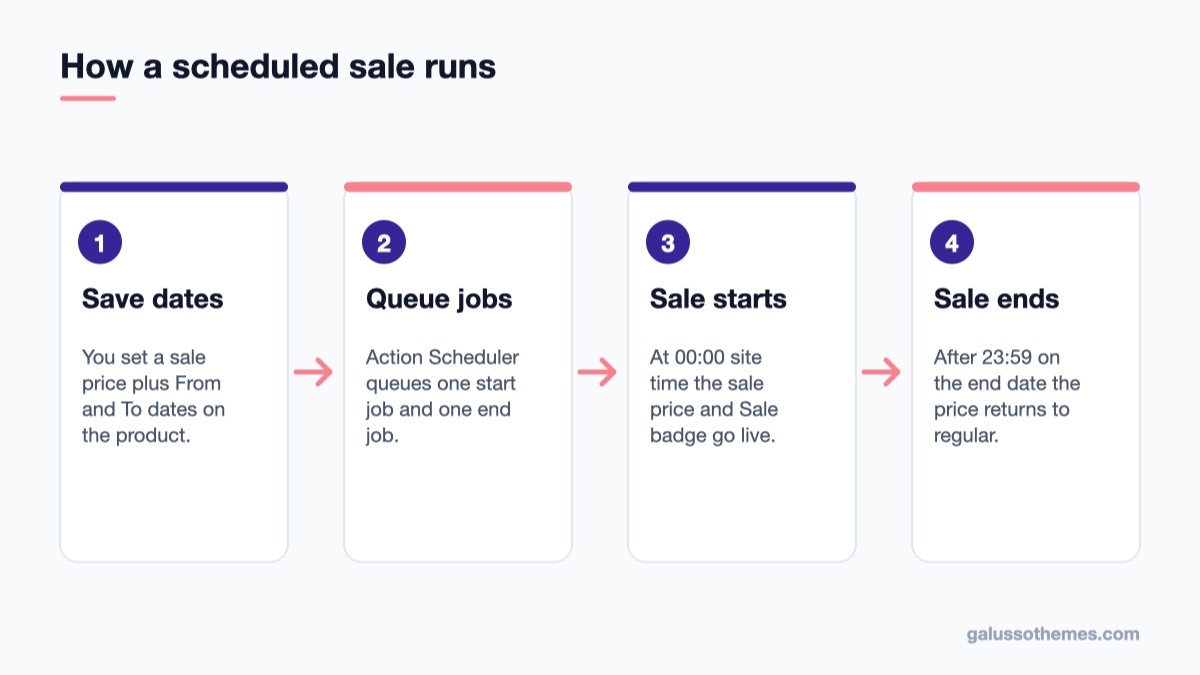
Saving sale dates queues two background jobs that switch the price on and off for you.
A scheduled sale is just two extra values stored on a product: a sale start date and a sale end date. When you save a product with those dates, WooCommerce queues two background jobs through Action Scheduler, the job queue that ships inside WooCommerce: one to start the sale and one to end it. In the WooCommerce source these are the wc_product_start_scheduled_sale and wc_product_end_scheduled_sale actions, grouped under woocommerce-sales.
As a safety net, WooCommerce also runs a daily cron event called woocommerce_scheduled_sales. It looks for any product whose sale should have started or ended and fixes it, so a missed job does not leave a sale running for weeks.
Three practical rules follow from this:
The start date begins at the start of the day and the end date runs to the end of that day (23:59:59). If you schedule a sale from 27 November to 1 December, it covers both those days in full.
Times follow your site’s timezone, set in Settings → General → Timezone in WordPress. If that is still “UTC+0” and your customers are in New York, your sale will start five hours early in their evening.
The jobs need site traffic or a real cron to run. On a quiet store with WP-Cron disabled and no server cron, a sale can start late. We cover how to check this further down.
Before you start: three quick checks
Spend two minutes on these before you set up a big promotion:
Timezone. Go to Settings → General and pick a city in the Timezone dropdown (for example “New York” rather than “UTC-5”). A city name follows daylight saving time; a fixed offset does not.
Regular prices are filled in. A sale price only works on a product that has a regular price. Products with an empty regular price are skipped by the variation bulk actions.
A backup or staging copy. Bulk price edits change a lot of products in one click. If your host offers a staging site, try the bulk steps there first.
Schedule a sale on a simple product
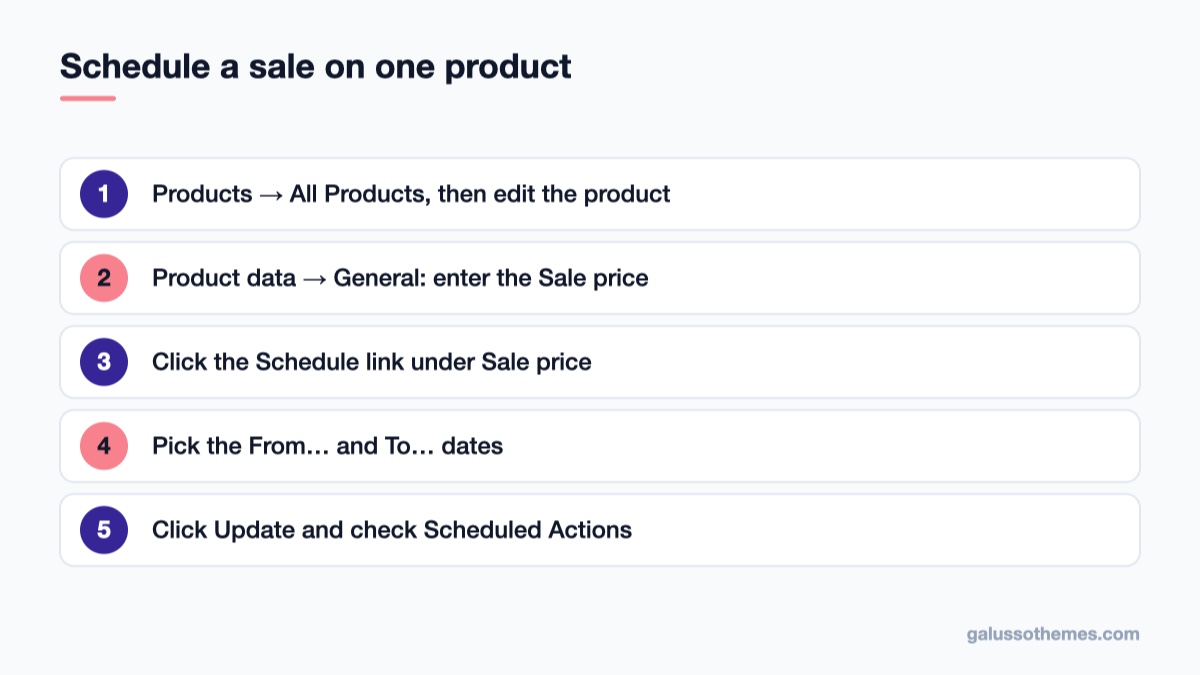
The built-in Schedule link on the General tab is all you need for a simple product.
This is the method to use for a handful of products, or for a “deal of the week” item.
Step 1: Open the product
Go to Products → All Products and click the product name to edit it. Scroll down to the Product data box and make sure the General tab is selected.
Step 2: Enter the sale price
Next to Regular price you will see Sale price. Type the discounted price as a plain number (for example 39, not $39 or 20%). The sale price must be lower than the regular price, otherwise the product will not show as on sale.
Step 3: Click “Schedule” and set the dates
Under the Sale price field there is a small Schedule link. Click it and two date fields appear: From… and To…. Pick the start and end dates in the calendar, or type them as YYYY-MM-DD.
Leave To… empty for a sale that starts on a date and never ends on its own.
Leave From… empty and fill in To… for a sale that starts as soon as you save and stops on a date (“sale ends Sunday”).
Click Cancel next to the dates to remove the schedule and go back to a plain sale price.
Step 4: Update the product
Click Update. If the start date is in the future, the shop keeps showing the regular price until then. On the start date, the sale price and the “Sale!” badge appear on their own. After the end date, WooCommerce clears the sale price and the dates, so the product goes back to normal and is ready for the next promotion.
Schedule sale prices for variable products
Variable products (a T-shirt in five sizes and three colours) keep their prices on each variation, not on the General tab. If you have not built one before, our guide on how to create a variable product in WooCommerce explains the attribute and variation setup.
One variation at a time
Open the product, go to Product data → Variations and expand a variation. Each one has its own Sale price field with a Schedule link, and it works exactly like the simple product version. This is the right choice when only one size or colour is on offer.
All variations at once
For a product with 15 variations, use the bulk actions dropdown above the variation list. The WooCommerce documentation lists these pricing actions:
Set sale prices – one sale price for every variation.
Set sale prices to regular prices decreased by (fixed amount or percentage) – the handy one for “20% off everything”.
Increase sale prices / Decrease sale prices (fixed amount or percentage).
Set scheduled sale dates – asks for a start and end date and applies them to all variations.
Do it in two passes: first set the sale prices, then run Set scheduled sale dates. Note that the sale price action replaces any existing sale price and saves straight away; you do not need to click Update for it, but click Save changes for any other edits you made. Variations with no regular price are skipped, so fill those in first.
Put many products on sale with bulk edit
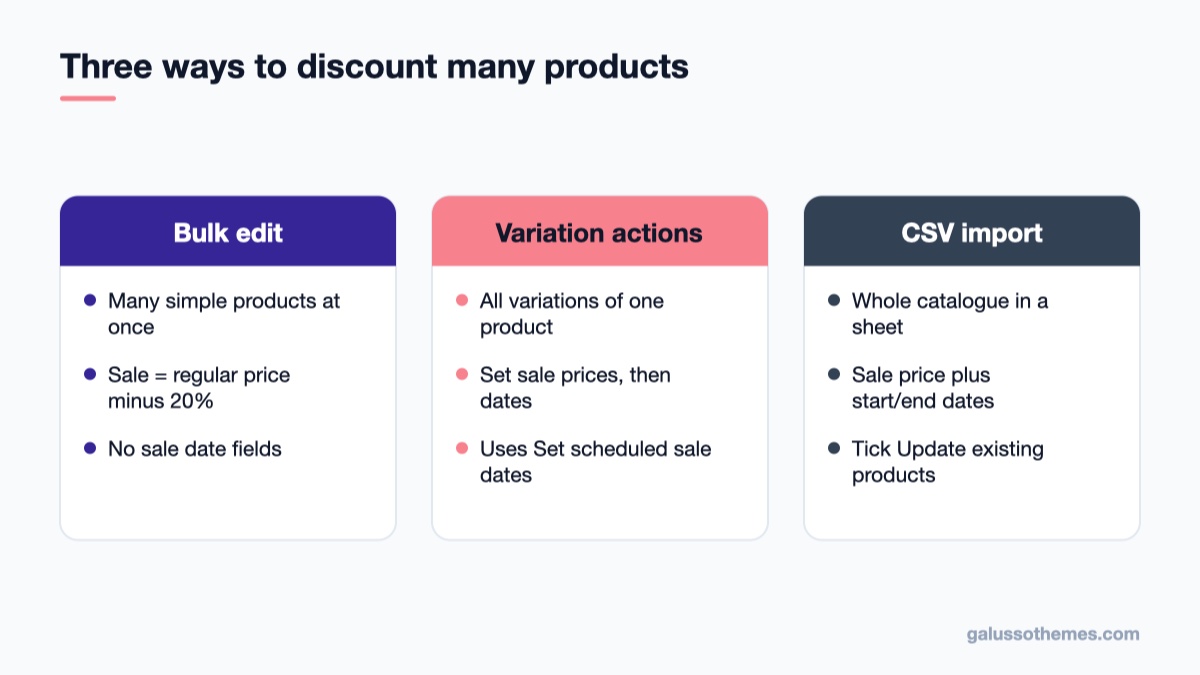
Pick the method that matches how many products you have and whether they need dates.
For a store-wide or category-wide sale, editing products one by one is slow. The product list has a bulk editor that can set sale prices for many simple products in one go:
Go to Products → All Products. Use the Filter by category dropdown (and Filter by product type if needed) to show only the products in the sale.
Tick the checkbox at the top of the list to select all products on the page. Raise the number of items per page in Screen Options if the category spans several pages.
Choose Edit in the Bulk actions dropdown and click Apply.
In the Sale dropdown, choose Set to regular price decreased by (fixed amount or %) and enter, for example, 20%.
Click Update.
There is one catch: the bulk editor sets sale prices but has no sale date fields. Prices set this way are live immediately and stay until you remove them. You have three options:
Run the bulk edit on the morning of the sale and clear the sale prices yourself when it ends, with Quick Edit or the CSV method below. This works for a short sale but depends on you remembering the end date.
Add the dates per product after the bulk price change, which is fine for 10-30 products.
Use a coupon instead of sale prices when the discount is the same everywhere (see the next section).
For a large catalogue where every product needs its own dates, a bulk price editor or a product CSV import is quicker. WooCommerce’s built-in CSV importer under Products → Import reads the columns Sale price, Date sale price starts and Date sale price ends, so you can export, edit the sheet, and import with Update existing products ticked.
Sale prices or a coupon: which to use
A coupon is often the cleaner tool for a short promotion. You create it under Marketing → Coupons → Add coupon, choose a Discount type (Percentage discount, Fixed cart discount or Fixed product discount), set the Coupon amount, and fill in Coupon expiry date on the General tab. The Usage restriction tab lets you limit it to certain products or categories, set a minimum spend, and exclude items already on sale.
Question
Scheduled sale price
Coupon
Is the discount visible on product pages?
Yes, with a crossed-out price and Sale badge
No, it applies in the cart or checkout
Can it start on a future date?
Yes, with the From date
No start date built in; publish it on the day
Ends automatically?
Yes, after the To date
Yes, after the expiry date
Can you limit uses per customer?
No
Yes, under Usage limits
Best for
Seasonal sales, clearance, deals you want people to see while browsing
Many stores combine both: scheduled sale prices for the public Black Friday offer and a separate code for newsletter subscribers. If you need things the core coupon screen cannot do, such as automatic cart discounts or BOGO deals, our list of WooCommerce coupon plugins covers the main options.
Show your sale products on the storefront
Once the sale is live, give shoppers one page where they can see every discounted item. You have two built-in options:
Product Collection block – add it to a page in the block editor and pick the On Sale collection. It only lists products that are currently on sale, so the page updates by itself when the scheduled dates start and end.
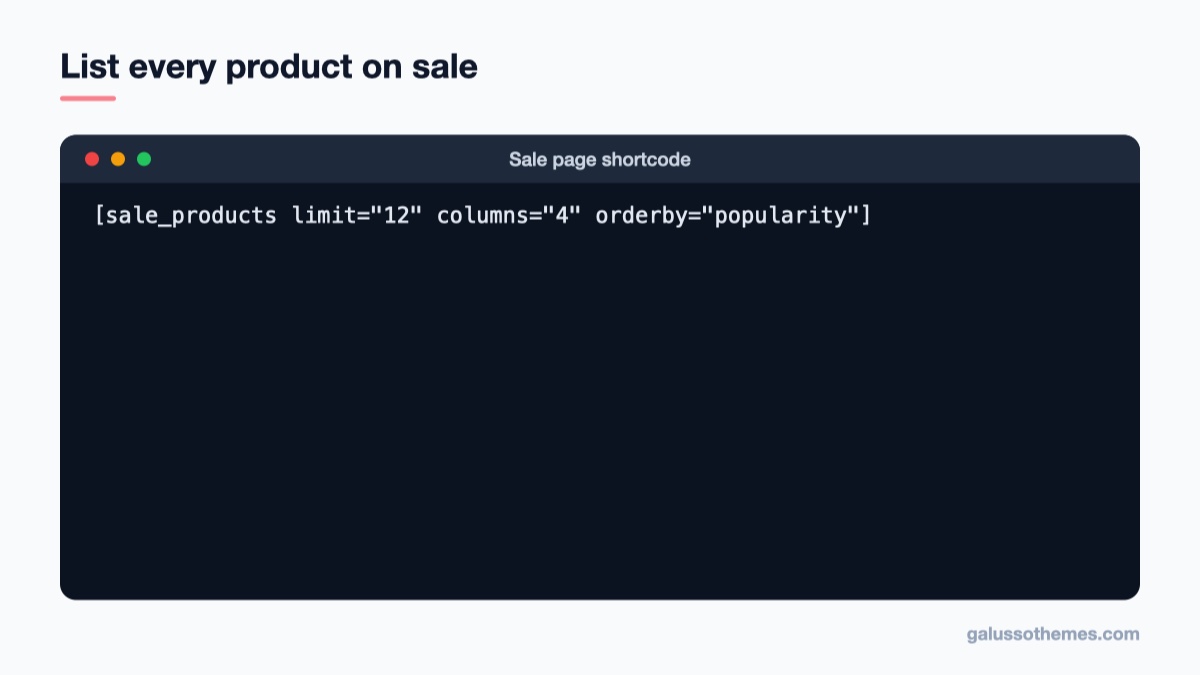
Shortcode – on a classic theme or page builder, use the WooCommerce shortcode below. It accepts the usual shortcode attributes such as limit, columns and orderby.
This shortcode shows only products whose sale is live, so the page updates by itself.
Create the page a few days early and link it from a header banner. Before the sale starts, it will be empty, so keep it unpublished or out of the menu until launch morning. A shop theme with a clear sale badge and a strong product grid helps here: GT Watches suits higher-ticket items where the crossed-out price matters, Parfum is built for beauty and gift stores that run seasonal offers, and GT Organic fits grocery and food shops with weekly deals. All three are WooCommerce-ready.
Watch the layout when sale badges and two prices appear: if product cards jump around while they load, our guide on fixing Cumulative Layout Shift in WordPress explains how to reserve space for them.
Check that your scheduled sale will actually run
The most common complaint is “my scheduled sale did not start”. In almost every case the background jobs did not run. You can see them yourself:
Go to WooCommerce → Status → Scheduled Actions (also reachable from Tools → Scheduled Actions).
In the search box, type scheduled_sale. You should see a pending wc_product_start_scheduled_sale and wc_product_end_scheduled_sale action for each product, with the scheduled date next to it.
Look at the Past-due filter. A list of past-due actions means the queue is not running on time.
If actions pile up as past-due, the site’s cron is the problem. Many hosts disable WP-Cron (with define( 'DISABLE_WP_CRON', true ); in wp-config.php) and expect you to add a real server cron instead. The WordPress developer handbook explains how to hook WP-Cron into the system task scheduler; a typical entry calls wp-cron.php every five minutes. For details on how the queue works, see the Action Scheduler documentation.
Common mistakes and how to fix them
The sale started at the wrong hour
Your WordPress timezone does not match your customers. Set a city under Settings → General → Timezone, then open each product and click Update so WooCommerce re-queues its jobs with the new time.
The sale price shows, but the product is not in “On Sale” lists
WooCommerce caches the list of on-sale product IDs in a transient. The scheduled-sale code clears it, but a page cache or object cache can keep serving the old page. Purge your caching plugin and any host or CDN cache after a sale starts.
The sale never ended
Check Scheduled Actions for a failed or past-due end action. If you edited the dates through a third-party importer or directly in the database, WooCommerce may not have queued the jobs; open the product and click Update to queue them again.
Variations ignore the schedule
The dates on the General tab do not apply to variations. Set them per variation or with Set scheduled sale dates in the Variations bulk actions.
Emails or order confirmations look wrong during the sale
Orders store the price that was charged, so past orders are not affected when the sale ends. If customers are not getting their order emails at all during a busy sale, follow our WooCommerce emails troubleshooting guide.
Wrap-up: your sale-day checklist
To schedule a sale in WooCommerce reliably, set the sale price, click Schedule, choose the dates, and confirm the jobs in WooCommerce → Status → Scheduled Actions. Use the variation bulk actions for variable products, the CSV importer for big catalogues, and a coupon when the discount should stay behind a code.
Your next step: pick one product today, schedule a one-day test sale for tomorrow, and check the next morning that the price switched on time. If it did, you can trust the same setup for your Black Friday week. For full reference, keep the official WooCommerce variable product documentation and coupon management guide close by.
Planning a new store for the holiday season? Browse our free WordPress themes for a WooCommerce-ready starting point.
Hello everyone! We’re Galussothemes content team, we love to write new blogs for WordPress Joomla! and other tech niches everyday. We’re talented young people who hold a strong passion for website development, designing, and marketing. Feel free to leave your comment if you have any issues or questions with our blogs.
Interesting with this topic? You also interest with this articles: